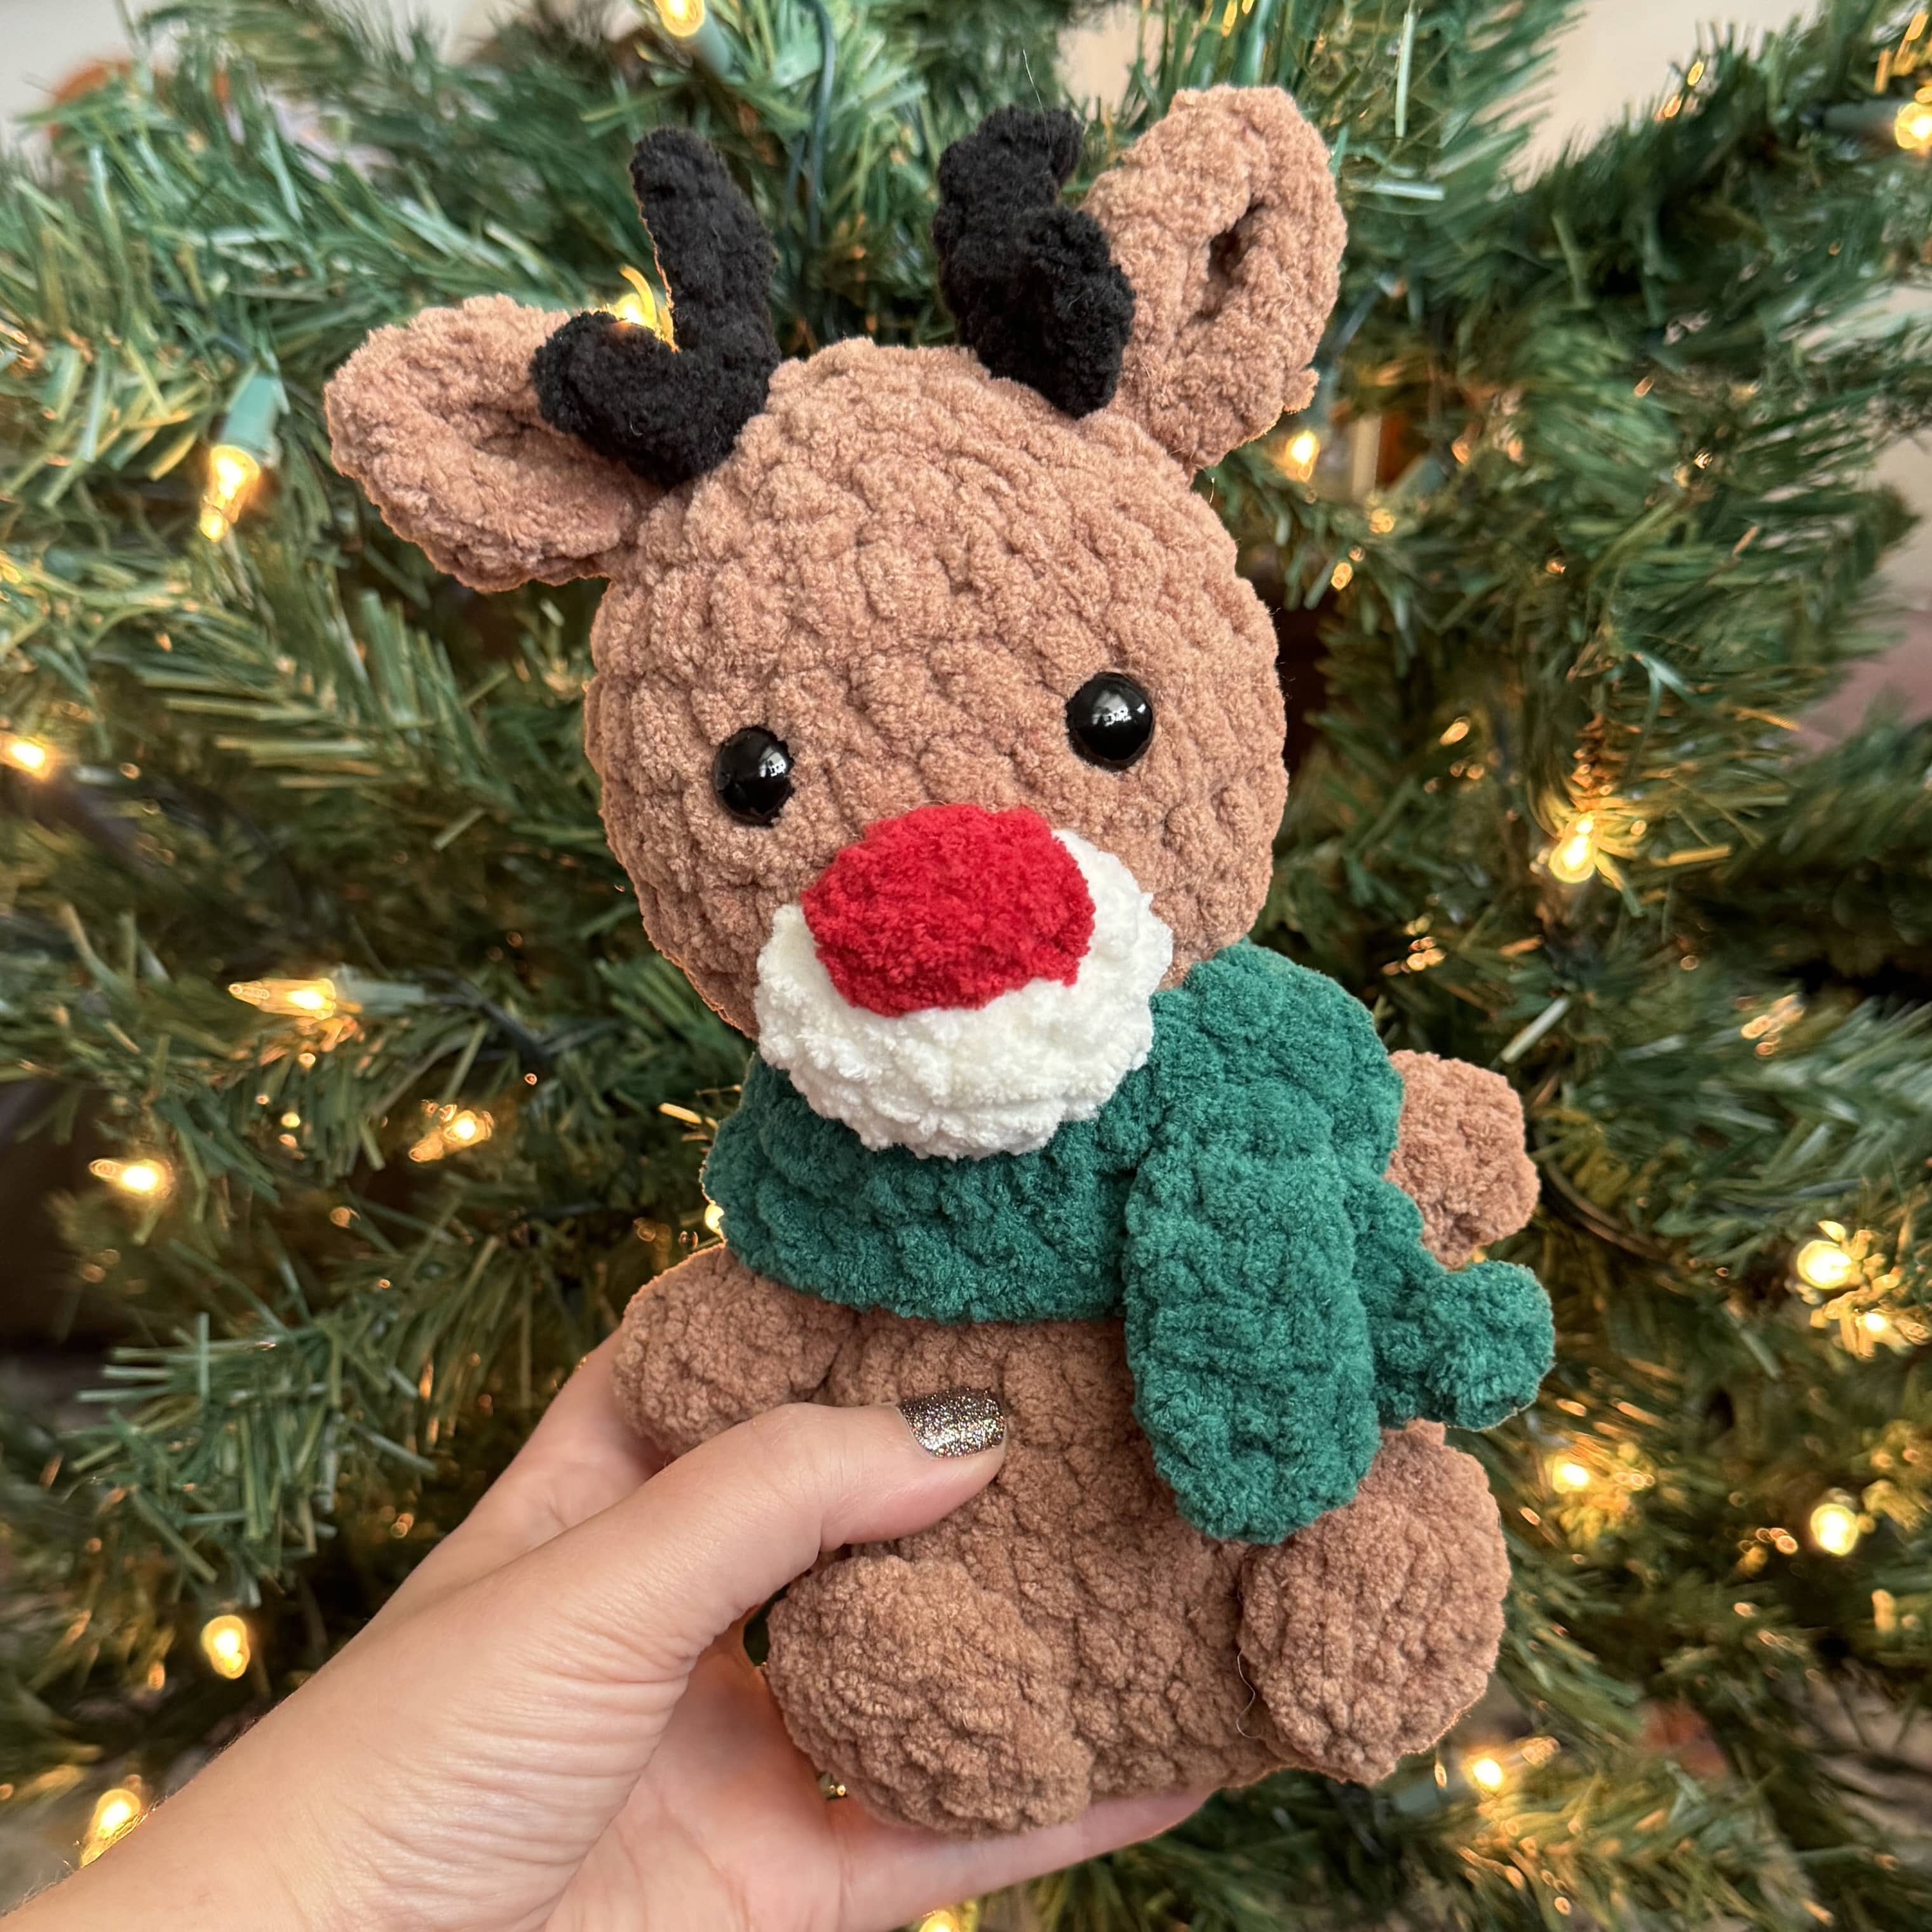
Free Crochet Snuggler Pattern Highland Cow
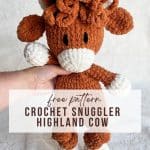
This Highland Cow Crochet Snuggler pattern would be perfect for a boho nursery! A crochet snuggler Highland Cow is a half stuffy, half blanket- the best of both worlds!
Free Crochet Snuggler Pattern
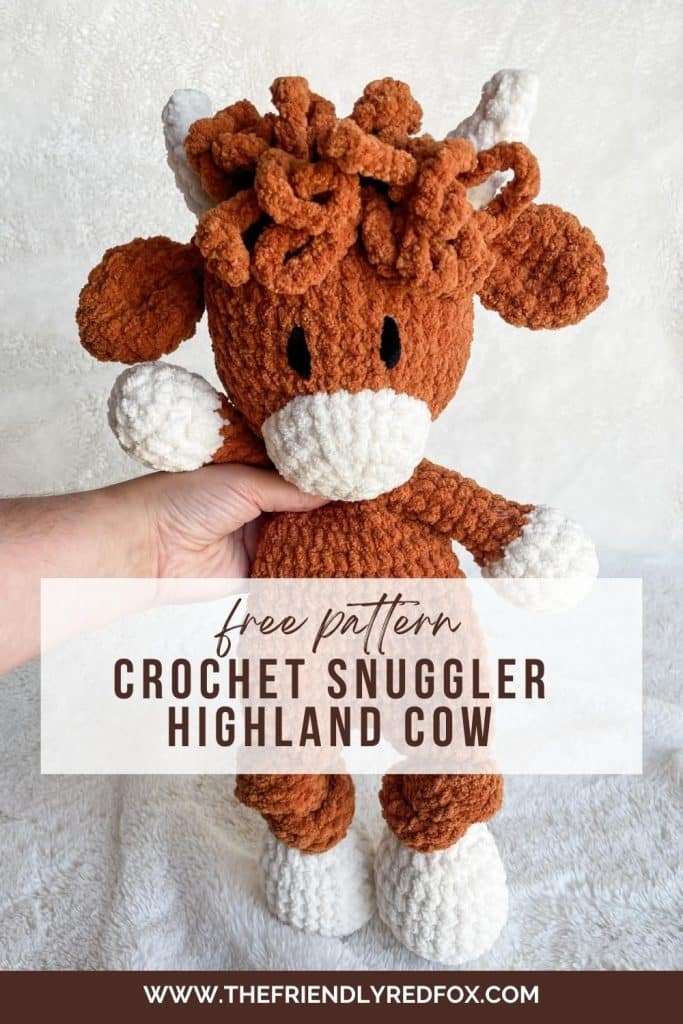
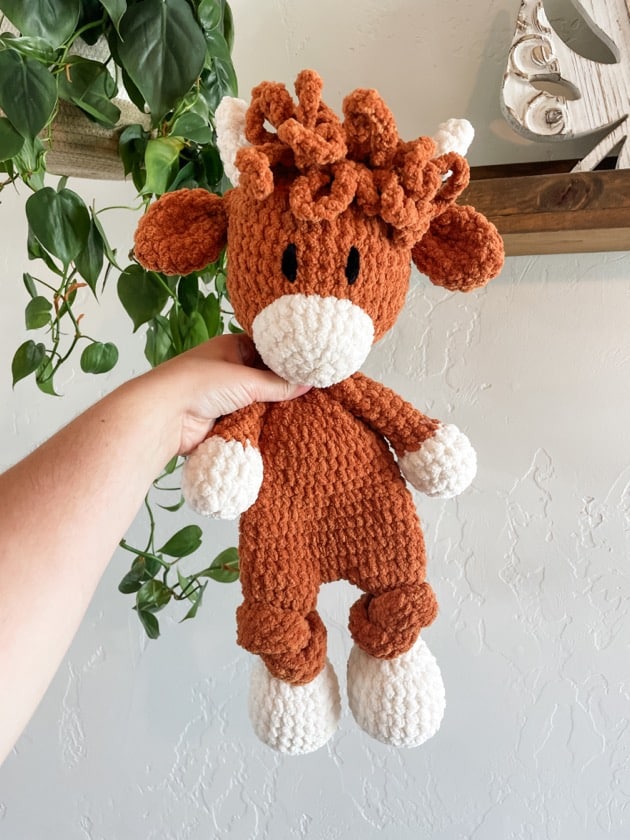
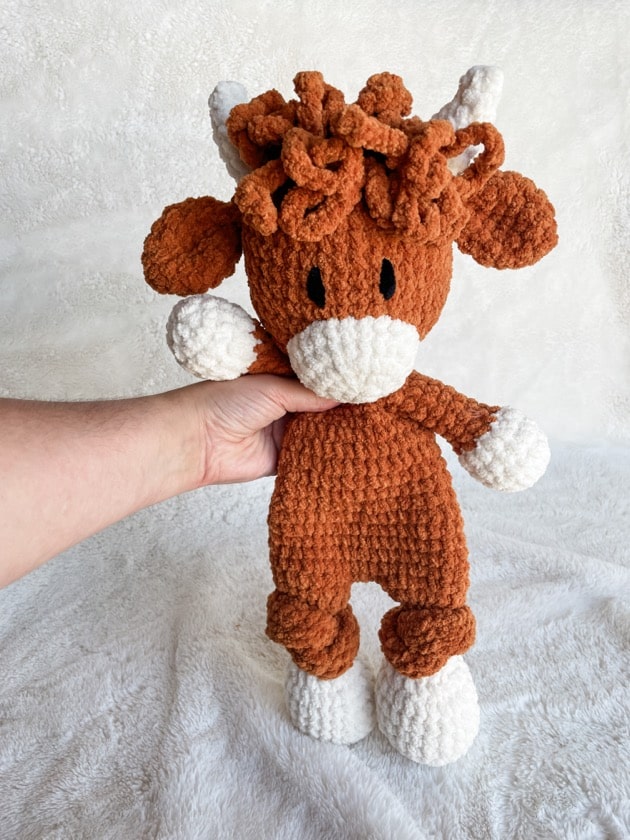
Someone asked me what my favorite design was yesterday, and I said that this crochet snuggler Highland cow is a top contender! You already know I love the snuggler– half blanket, half stuffed animal. But the loopy hair and horns on this free snuggler pattern has a special tug on my heart!
JOIN MY NEWSLETTER TO RECEIVE…
A free email course-Amigurumi 101
This free amigurumi email course gives you what you need to master the basics of amigurumi, along with some extra tips and tricks!
This crochet snuggler Highland cow is made with Premier Basix Chenille, but you could substitute Bernat blanket yarn instead. I prefer the Premier, because it seems a little more lightweight and easier to work with, but I love the color options for the crochet snuggler patterns that blanket yarn has! It comes out to be about 16 inches tall. You can see my four-year-old holding it in some of the pictures, so you can have a reference.
Wouldn’t this be such a great gift for someone who has a boho nursery? I also made a more traditional looking highland cow crochet pattern that is also very fun! And recently released this squishy highland cow! Or if you want something a little more classic, you can try the Snuggler Bear pattern!
Would you like to save this project for later? Input your email address below, and we will promptly deliver the project to your inbox.
Want the Ad-free, Printable PDF?
You can find it in one of my stores!

Materials you’ll need
To get started making this free crochet snuggler highland cow pattern, you’ll want to gather all your materials first.
There is a whole section where you can find tutorial videos for different parts of this pattern. Most are linked in the section they are specific to, but if you want to view them before you begin you can see the collection here.
Snuggler Highland Cow Crochet Pattern
Neck Strengthener
*Click here for a video and picture tutorial on how this works*
In a magic circle, SC 7. SC in each around for a total of 12 rows. Fasten off and leave a long tail to sew the hole closed and sew through the neck. See attached PDF.
Crochet Highland Cow Body Pattern
Feet/Body/Head
Beginning with the feet and using the winter white:
Round 1: In a magic circle, SC 8.
Round 2: SC INC in each around. (16)
Round 3: SC in the first, SC INC in the next. Repeat around. (24)
Rounds 4-7: SC in each around. (24)
Round 8: SC in the first, INV DEC in the next. Repeat around. (16)
Round 9: INV DEC in each around. (8)
Change to the rust colored yarn here.
*Stuff the foot part, but not the next chain rows.*
From here on, you will be chaining 2, DC in the same stitch and crochet around. Then attach to the first stitch with a slip stitch. This creates the part of the leg that you will knot. You can knot before you attach the legs or afterwards. The foot may be “squished” a bit as you tie, but there should be enough length. I created a video to show the next part of the leg, and you can see that here.
Rounds 10-19: DC in each around. (8)
Round 20: SC INC in each around. Attach to the first stitch with a slip stitch and chain 1 (16)
Round 21: SC in each around. (16)
Fasten off the first foot. On the second foot, chain 4 and slip stitch to the first leg where you fastened off. Click here for a video and photo tutorial of this next part!
Round 22: Chain 1 and SC in each stitch around on the leg (16). SC in each chain across. (4) SC in each stitch around the second leg. (16) SC on the other side of the chain. (4) Attach to the first SC with a slip stitch. (a total of 40)
Rounds 23-27: SC in each around. (40)
Round 28: SC in the first three. INV DEC in the next. Repeat around. (32)
Rounds 29-33: SC in each around. (32)
Round 34: SC in the first two. INV DEC in the next. Repeat around. (24)
Round 35-37: SC in each around. (24)
Round 38: SC in the first. INV DEC in the next.. Repeat around. (16)
Round 39: SC in each around. (16)
Round 40: INV DEC 8 times. (8)
From here we are increasing the head. Have your neck strengthener ready to insert. Watch here so you know how it works!
Round 41: SC INC in each around. (16)
Round 42: SC in the first, SC INC in the next. Repeat around. (24)
Round 43 SC in the first two stitches, SC INC in the next. Repeat around. (32)
Round 44: SC in the first three stitches, SC INC in the next. Repeat around. (40)
Round 45-53: SC in each around. (40)
Stuff here, and continue to stuff as you close. Place the neck strengthener if you haven’t already.
Round 54: SC in the first 3, INV DEC in the next. Repeat around. (32)
Round 55: SC in the first 2, INV DEC in the next. Repeat around. (24)
Round 56: SC in the first, INV DEC in the next. Repeat around. (16)
Round 57: INV DEC in each around. (8)
Sew the remaining hole closed.
Crochet Highland Cow Parts
Snout
In ivory:
Round 1: In a magic circle, SC 6
Round 2: SC INC in each stitch around (12)
Round 3: SC in first, SC INC in next. Repeat around. (18)
Rounds 4-5: SC in each around. (18)
Fasten off and leave a long tail to sew on to the face.
With plush yarn, I find it easier to attach the snout after I stuff the head.
The bottom of the snout should be at the base of the head, near where it connects to the neck. It should cover about 4 rows. Pin it in place and use the tail to attach it. Stuff it lightly before you close. This is a quick video that shows my favorite way to sew open pieces like this on!

Ears (make 2)
Round 1: In a magic circle, SC 8.
Round 2: SC INC in each around. (16)
Round 3: SC in each around. (16)
Round 4: SC in the first, SC INC in the next. Repeat around. (24)
Round 5: SC in each around. (24)
Round 6: SC in the first, INV DEC in the next. Repeat around. (16)
Round 7: SC in each around. (16)
Round 8: INV DEC in each around. (8)
Round 9: SC in each around. (8)
Fasten off and leave a long tail to sew it on. Fold the bottom and sew a few times to keep it folded over. Sew onto the head, about 7 rows out from the top center of the head.
Horns (make two)
In ivory:
Round 1: In a magic circle, 6 SC.
Round 2: SC in each around. (6)
Round 3: SC in first, SC INC in next. Repeat around.(9)
Round 4-5: SC in each around. (9)
Round 6: SC in first 2, SC INC in next. Repeat around. (12)
Round 7: SC in each around. (12)
Fasten off and leave a long tail to sew it on. Stuff very lightly and then attach it right inside the ears.
Eyes
I use bulky black yarn and sew two eyes. Two stitches tall and four stitches apart, centered above the nose. Here is a video of me doing it!
Arms
Stuff the hand and the bottom half of the arm as you go.
With the ivory yarn:
Round 1: In a magic circle, SC 8.
Round 2: SC INC in each around. (16)
Rounds 3-5: SC in each around. (16)
Change to the Rust color.
Round 6: INV DEC in each around. (8)
Rounds 7-15: SC in each around.
Fasten off and leave an extra long tail. Sew the opening closed.
Attach the arms between rows 35-37 of the body. Use the yarn through method, or if you prefer you can do it the traditional way.
Fluffy Hair
Leaving a long tail, chain 20. Attach with a slip stitch to the first chain. This is one loop. Chain 20 and again slip stitch it to the first chain. Repeat this for a total of 14 loops. Fasten off and leave a long tail. This is what you will use to attach the hair on the head.
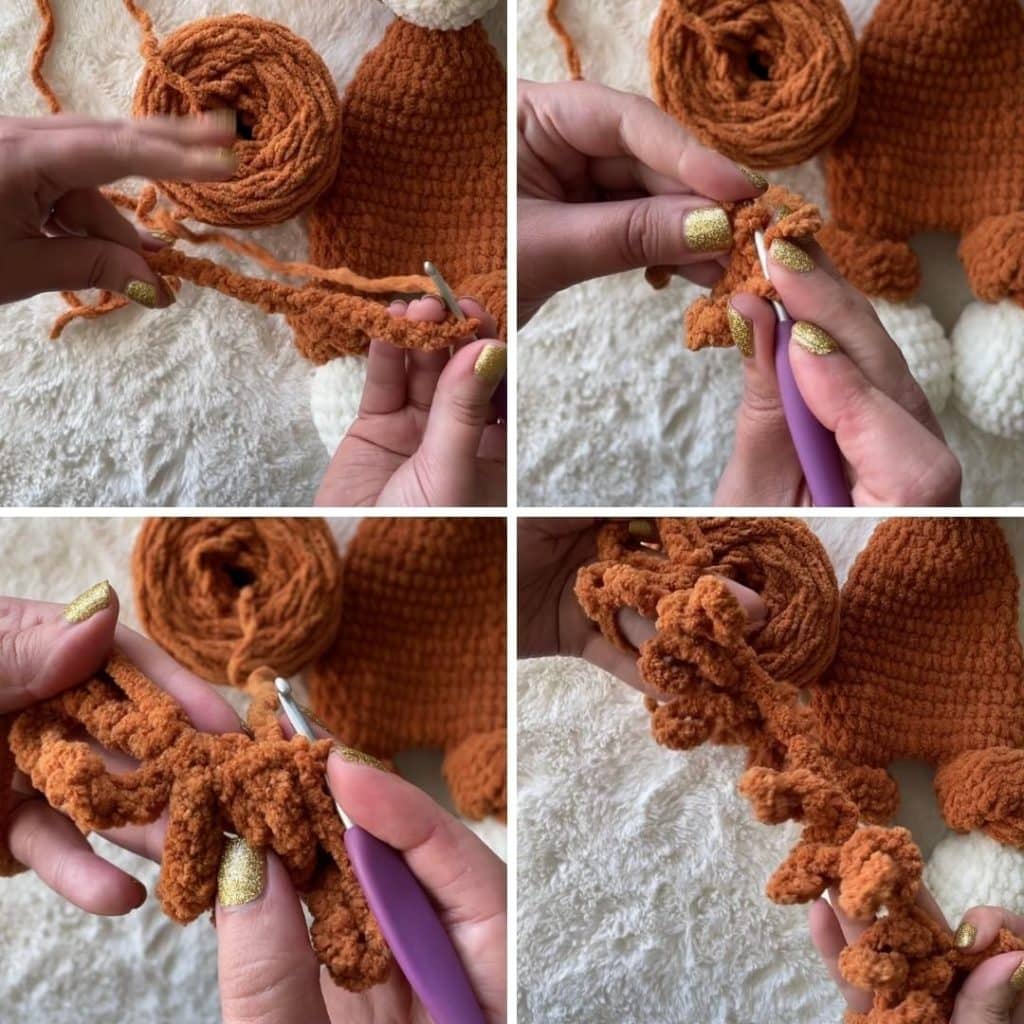
Pin one end to the front of one horn. Following the line of a row, pin the loop that is in front of the horn. You will double the loops back to the other end, for a total of two rows of hair. Using your long tail, sew over the line that was made where you slip stitched the loops.

Did you make this pattern?
Mention me @thefriendlyredfox so we can see your creations! You can also leave a comment below!


Can you stuff the body if you so wish? Maybe before you start the head?
Yeah you can! I think it would be cute, I just have not tried it yet!
This is such a good baby toy!
I also made a tail by just chaining 23 and sc 2 into each st around.
Thank you so much!!!
Just finished one. Wish I could attach a picture. Thanks!
I made the cow in pastel rainbow colors for my great granddaughter coming in August. No sure how to post a picture
can you make this beautiful pattern no sew?
Unfortunately, because of ear, horn and hair placement, this pattern is definitely not no-sew. If you’re struggling to sew them on with plush yarn, use a matching worsted weight yarn to attach them! It helps immensely! 🙂
Even with the video I am very confused about the legs…. I can’t see very well in the video where you’re putting stitches. Is there another way I can do it? I am very experienced in crochet but I can’t figure this out for some reason.
I’d be happy to offer more help! Which part of the legs are you confused about? The double crochets? Where they attach together? How to knot them?
Do you have to slip stitch and chain 1 in each round? Or can you just continue the round with the SC? I’ve never crocheted on the round that way
You will join with a slip stitch for the long legs, but other than that, it’s worked in a continuous round! Use a stitch marker to keep track of your last stitch in the round.
What are the finished measurements on this?
Around 16″ when made with the recommended hook and yarn!
Thank you for this great pattern. I am loving making it right now. However, I am confused. The cow does not look stuffed; however, when you click on the link for putting in the neck stiffener, it says not only to stuff the neckpiece but also the body. So, is the body stuffed on the highland cow or not? It doesn’t look like it in the pics but then won’t you feel the tube if it isn’t stuffed? Thanks.
Hi! The snuggler bodies are not stuffed. The tutorial for the neck strengthener works for multiple styles of bodies. You can’t really feel the tube because it’s all plush, but if you wanted to sew it up a little further so the bottom end is shorter, then that would be ok!
This was a fantastic PDF, Thank you so much! The hair was the perfect addiction.
Thanks so much! Glad you enjoyed it!
OMG, these are actually sooo adorable I’ve loved making these ❤️💙
Thank you so much for sharing the pattern
I have a friend going into surgery that lives in Texas and is in love with highland cows. This will be a perfect gift for her! Thank you for sharing
I love the cow and the recipe, but I’m having trouble understanding what “INV DEC” means.
Yes! It’s an invisible decrease: (put hook through the FRONT LOOP ONLY of two consecutive stitches [two loops on hook] Yarn over pull through both loops. [two loops on hook] Yarn over pull through two loops)
I love this snuggler! I’m having a lot of trouble with the yarn. It gets stuck really easy and the fuzzies come off the yarn. Do you think I’m crocheting too tight?
Is there a trick with this type of yarn?
Thanks!
Crocheting too tight is always a possibility! You could try going up a size hook if you need to. There are also different qualities of plush yarn – some shed more than others!
Hi! I’m confused, do you stuff the head?
Yes – the head is stuffed!
Love your patterns! I’m planning to make this for my nephew but he wants a “spot” cow. I just finished making your giraffe snuggler for my son. Think I could add spots the same way for this one to make it more “spot cow” like for him?
Oh yes!! That would be so cute!
I love these snuggle patterns , I have made them all thank you so much..
This is the 1st snuggler that I’ve made and I love it!!! Soooooo cute!!!